25 Spooktacular Scary Halloween Decorations That Will Terrify Your Guests (You’ll Love #12!)
Halloween season is here and I crave a look that thrills without turning my weekend into a craft marathon. The porch glows with strange light, a wind dances through fake cobwebs, and the night feels full of whispers. I wanted a plan that gives you big scare power with simple steps, so I wrote this post about 25 spooktacular ideas you can actually pull off.
Why I made this post I put this together because scary decor should be fun, not stressful. You can get a strong vibe with smart choices, cheap props, and a little lighting magic. If you love hosting, decorating, or turning your yard into a small scene, this one’s for you.
Who it’s for You’re the kind of person who likes a dash of fright plus a lot of charm. Maybe you throw a party, welcome trick or treaters, or just want a kid friendly scare at home. This guide speaks to you and your space no matter how big or small.
What you’ll get Here are 25 ideas that cover look, setup, and payoff. They are budget friendly, DIY friendly, and easy to assemble. They work indoors or out, on a porch or in a living room. You can mix and match, start with one centerpiece, and grow your scene as you go. And yes, you’ll love #12 because it often makes the biggest splash.
You’ll find practical steps that make these ideas doable in real life. Pick a focal point, light from behind or low to cast eerie shadows, and test the effect after dark. Use simple materials like black fabric, LED strands, cotton webs, and plastic props. A small fog effect or a chilly glow can push the scene from good to terrifying. These tweaks are easy to replicate and tailor to your space.
This guide stays flexible for different spaces, budgets, and ages. It respects safety while pushing the spooky vibe just enough to thrill. It’s designed to help you plan, shop, and set up without a long haul. Read on, pick a few ideas, and start turning your space into a stage where guests will feel a little scared, a lot impressed, and ready to share the moment.
1. Creepy Candle Holders

Want to make your Halloween glow feel real? Creepy candle holders do the work. They come in skull, bat, and hand shapes. When you place a candle inside, tall shadows creep across the walls. Here is why this works: the moving light stirs the room.
Here is how to get the look without trouble. Buy ready-made holders or make your own. Use clay, wood, or glass. Paint them black. Add fake cobwebs. For a personal touch, carve or engrave tiny designs or spooky phrases.
– Use LED candles for safety, especially with kids or pets.
– Pair your holders with a dark table runner or a spooky centerpiece to boost the theme.
– Place a focal holder on the mantel, or spread several around the room for a cohesive look.
Smart setup tips. Start with two or three shapes on a tray by the entry. For a dramatic finish, group them on a console and let the glow spill onto the wall. You get mood lighting that is easy to pull off and safe.
With these simple steps, you can add fright and warmth at once, no fuss required, and adjust the look as you go. Experiment with positions until the glow matches your space.
Set the mood this Halloween with creepy candle holders! Whether you buy or DIY, the right lighting can turn any space into a haunted haven. Let those shadows dance and terrify your guests!
2. Sinister Spider Webs

Sinister Spider Webs
You want a spooky look that is simple to set up. You can create a haunting effect with spider webs that stretch across doorways and ceilings. Use cotton or polyester fibers for the webs. They are light, easy to work with, and cheap. Layer different textures for depth. Add artificial spiders and glow-in-the-dark accents to bring the scene to life when the lights go out.
Here is why texture matters. A single net looks flat. Mix thin strands with thicker webbing to catch the eye. Place webs across entryways so guests feel like they walked into a haunted room. Drape some over mirrors or chairs to surprise people.
Next steps for setup. Hang the webs with removable hooks so you can take them down fast after Halloween. Pin or clip the ends to keep them in place. Keep a few extra pieces around in case you want to adjust the look.
Here are tips you can use:
– Use spiders in different sizes. Put the biggest ones up front and scatter smaller ones through the web.
– Add glow-in-the-dark spiders and powder that shines under black light.
– Treat the webs as a temporary feature to avoid sticky residue on walls.
Cleanup is easy with hooks and a quick pull when the season ends.
3. Haunted Portraits

Haunted portraits are perfect for adding mystery to your Halloween setup. You want art that feels alive in a subtle way, not a scream on the wall. Use portraits that show ghost figures, misty landscapes, or antique faces. They work best when the frame and the image vibe together.
These portraits work in many rooms. You can print copies on canvas or use sturdy framed prints. Keep the colors simple so the faces stay readable. A small wall with two or three portraits creates a calm yet eerie look.
Here is how to pull it off.
– Choose your vibe. Ghostly figures, moonlit scenes, or vintage portraits set the tone.
– DIY or buy. You can buy ready-made canvas prints or print eerie images at home and stretch them.
– Make it look old. Sand the frame lightly, paint with charcoal or midnight blue, and rub the edges for wear.
– Light it from below. A small LED under the frame makes figures seem to rise.
– Go with angles. Hang portraits at odd angles or above dim corners.
– Best spots. Place them near entries or in living spaces to invite a closer look.
– Add sound. A motion-activated whisper fills the air without loud effects.
– Next steps. Gather a few frames, pick images, and test your setup with a low-watt lamp.
That small touch can set the mood instantly.
4. Ghoulish Garden Statues

Want a Halloween vibe in your yard without a full haunt? Ghoulish garden statues do the job fast. You can pick skeletons, scarecrows, or zombie figures that loom by flower beds or line your path.
Here is why this works:
– They set a spooky scene with almost no effort.
– Varying sizes and positions give your garden real depth.
– A splash of orange and purple plants makes the statues stand out.
Ways to make them pop:
– Place statues at different heights to create a layered look.
– Add a solar or motion light to highlight the figures after dark.
– Keep paths clear so guests see the scene without tripping.
– Place statues along a curved path to guide visitors.
DIY and shopping tips:
– Find ready-made statues at local stores for a quick setup.
– Try a DIY foam figure: cut, paint, seal, and place where it stays dry.
Weather and care:
– Choose weatherproof materials and bring pieces inside after heavy rain.
Next steps:
– Test the display at night, tweak lighting, and adjust spacing for your best scare.
– Rotate the statues next year to keep the look fresh.
5. Macabre Mantle Displays

Your mantle is a canvas for Halloween. You want a look that feels spooky but stays easy to refresh. This macabre mantle makes the mood last without a lot of work. Here is how to build it.
– Layer with depth – Start with a garland like black lace or faux cobwebs to set a haunted base. Let the texture run along the mantel so you feel a tunnel of darkness as you pass by.
– Vary heights – Tall candlesticks paired with shorter pieces draw the eye and add drama. Varying heights create layers that guide the gaze from one item to the next.
– Choose dark colors – Use deep reds and blacks to give the display a chilling mood. Color blocks at different heights make the scene feel alive and old.
– Introduce eerie figures – Place ghosts or witches so they peek from behind decor, not center stage. Let these figures surprise guests as they catch a glimpse from the edge.
– Light it right – Hide LED lights and use battery candles for a soft flicker. Drape cords away and secure them under shelves so the glow looks natural.
– Keep it fresh – Swap in monster figurines or spooky books to refresh the look through the season. Set aside a couple of pieces you rotate weekly for ongoing variety.
Next steps: set up the display in daylight first, then tweak heights and placements until it glows just right at night. With a little trial and care, your mantle becomes a true Halloween focal point that wows without a lot of fuss.
6. Chilling Window Silhouettes

You want a quick, budget-friendly way to scare guests at night. Chilling window silhouettes turn plain glass into a haunted stage with almost no work. They work on any home and stay visible from the street.
– Materials Black construction paper or thin cardboard, scissors, and removable tape or window-safe adhesive. Have a pencil for tracing and a small ruler to help with straight lines.
– Preparation Cut out bats, ghosts, or witches. Tape the silhouettes to the inside of the window so the effect looks sharp. Layer several shapes and vary sizes to add depth.
– Lighting Dim the inside lights. Add a colored bulb or small lamp outside to cast eerie shadows. Keep the images clear so they read well from a distance.
– Design ideas Create a small scene with multiple figures. A pale crescent moon behind a flock of bats adds drama. A witch at a cauldron or a ghost peeking over a sill works great.
– Care and removal Use light, removable tape so cleanup is quick and won’t scratch glass. After Halloween, peel away gently and store silhouettes flat for next year.
– Keep it fresh Rotate silhouettes through the season. Swap in pumpkins or skeletons to change the mood and keep passersby curious.
Now you are set to start.
7. Sinister Skeletons

You want a scary yet doable Halloween display. Sinister skeletons can deliver that mix. They fit inside rooms, by doors, or in the garden. They can be life like or silly. You decide the feel.
Choose a skeleton you can pose. Realistic models look stern and eerie. Cartoonish figures add a wink of humor. Keep a few different styles for contrast.
Placement matters. Put skeletons where guests won’t expect them. From ceiling hooks to chair seats or hidden in bushes, the surprise earns the reaction.
A small trick adds punch. A shy glow from a light can make the bones pop and catch the eye.
– Poseable models make setup easy. You can bend arms and legs to craft funny scenes.
– Move or make sound options boost the fright. A little creak or groan as someone passes is enough.
– Dress up to add character. A tattered cloak, a hat, or a tiny cape changes the mood fast.
– Finish touches like weathered paint or glow paint on the bones help them stand out at night.
Next steps:
1) Pick 2-3 poseable skeletons that share a vibe.
2) Plan spots where the bones will catch the eye.
3) Add small props and, if you dare, a low motion device.
4) Test the scene after dark and adjust.
This setup works best when you keep the idea simple and fun for guests.
8. Bewitching Banners

Want a festive Halloween look without a lot of fuss? Bewitching banners are your answer. They add color and whimsy to any room.
Here is why banners work and how to use them.
– DIY banner options: Fabric bunting, paper garland, or felt cutouts tied with twine. Cut shapes like bats, pumpkins, or letters. String them across a doorway, mantel, or along the dining table.
– Color and style: Pick a theme. Classic spooky tones are dark purple, green, and black. Add a pop of orange or gold for warmth. Match banners to your curtains, rugs, or candles for a united look.
– Display ideas: Layer banners at different heights. Drape one over a doorway, another along a wall, and a third around a centerpiece. Let LED candles cast soft shadows on the fabric.
– Family fun: Let everyone contribute. Kids cut shapes, sign a name, or write a message. You get a personal touch with little effort.
– Safety and care: If you use real candles, keep banners away from flames. Battery candles give the same glow without risk. Store banners flat or rolled to prevent creases.
Next steps. Ready to start? Gather simple supplies this weekend and create your own bewitching banner display.
9. Terrifying Table Settings

Here is why you want to nail your Halloween table. Guests arrive hungry and a little scared. A strong table setting makes the meal feel like a story you tell with food and decor. Let’s break it down.
– Base layer: Start with a dark tablecloth in black or deep purple. It makes colors pop and creates shadows that look alive.
– Centerpieces: Add spooky focal points. Think small skulls, carved pumpkins, and faux spider webs. Keep some height but not too tall to block guests from talking.
– Dinnerware: Choose ghost or skeleton designs on plates and bowls. It sets the mood without making meals hard to serve.
– Drinks and treats: Use a few fun, blood-red drinks in a clear dispenser. Fill them with gummy worms or small gummy eyes for extra scares.
– Lighting: Put in flickering candles or LED candles. They cast soft glow and reveal ghostly shapes around the room.
– Personal touches: Create eerie place cards with a simple, spooky font. It personalizes each seat.
– Textures and vibe: Scatter dried flowers or twisted twigs around the table edge to suggest a haunted forest.
– Layout tips: Leave space for easy movement. Don’t clutter; guests should slide in plates and pass foods without bumping decor.
– Safety note: If you use real candles, keep them away from cloth and webs. LED options are safer.
Next steps: shop the look, gather a few key pieces, and set the table early so you can tweak it.
| Decoration | Materials | Cost | Suggestions |
|---|---|---|---|
| Creepy Candle Holders | Clay, wood, glass, fake cobwebs | $17.98 – $22.99 | Use LED candles for safety; pair with dark table runner. |
| Sinister Spider Webs | Cotton or polyester fibers, artificial spiders | $11.99 – $23.99 | Layer different textures; use removable hooks for easy cleanup. |
| Haunted Portraits | Canvas prints, frames | $129.99 – $24.99 | Light from below; hang at odd angles. |
| Ghoulish Garden Statues | Plastic or weatherproof materials | $17.99 | Place at different heights; add solar lights. |
| Macabre Mantle Displays | Garland, candlesticks, figures | $6.99 – $19.70 | Vary heights; swap in new pieces weekly. |
| Chilling Window Silhouettes | Black construction paper, tape | $16.92 | Use removable tape; create scenes with multiple figures. |
| Eerie Lighting | String lights, lanterns, colored bulbs | $11.99 – $22.99 | Mix different light sources; dim for effect. |
10. Eerie Inflatable Figures

Eerie inflatable figures are a simple way to grab attention outside with little effort. They fill space, glow after dark, and add a playful spook to your porch or yard. Here is why they fit Halloween, and how to use them well.
– Choose inflatables with built-in lights so they stay visible after sunset and set the mood without extra work.
– Pick figures that move or sway in the wind for a lifelike touch.
– Place them near your entrance to greet guests with a mix of fright and fun.
– Secure them firmly with stakes or tether lines to weather windy nights.
– Mix sizes and poses to build a scene that draws the eye from every angle.
Start small. A big figure grabs attention, then add two smaller ones later.
– Put a large ghost or skull at the back.
– Line the path with two smaller figures at different heights.
– Add a color pop with a bright bat or pumpkin.
– Materials and care: Most inflatables are made from nylon or polyester. They handle light rain, but bring them in during a storm.
– Safety tips: Check the plug and zipper. Use weatherproof cords. Deflate if winds get strong.
– Storage: Let the unit dry, then fold and store in a dry place.
11. Goblin Garlands

You want a simple way to add whimsy or a touch of spook to your space. Goblin garlands work indoors or outdoors. They mix cute and creepy figures on a string for instant charm. You can buy ready made garlands or make your own with felt, buttons, and string. Hanging them over doorways, mantels, or around the dining table creates a festive line of magic. Pair goblin garlands with other Halloween decorations to build a layered scene.
To boost the glow, add lights along the garland. The tiny twinkles make the goblins seem alive as guests walk by.
– Use materials such as colorful felt, googly eyes, and lightweight string.
– Mix colors and textures so the garlands pop.
– Finish with leaves or pinecones for a seasonal touch.
Keep it light. Make sure the garland isn’t heavy so you can hang it without hurting walls or surfaces. Use removable hooks or tape.
If you use it outdoors, choose weather resistant fabrics and check fasteners after rain.
Next steps: plan a 6 to 8 foot garland, test fit, then hang. Store garlands in a labeled box to reuse next year.
With a little care, you can reuse it year after year.
12. Glaring Ghosts (You’ll Love This One!)

You want a standout Halloween display that grabs attention. Glaring ghosts can deliver that. They are life-size figures made from sheer white fabric that flutters in the breeze, giving your yard a spooky, movie-like feel. You can hang them from trees, set them along the lawn, or place them around your porch.
Some versions include LED lights for a soft glow after dark. If you want a cheap, quick option, grab old sheets and turn them into your own ghosts. Add faces with fabric markers or acrylic paint to give them character.
– Anchor tips: use garden stakes or heavy rocks to keep them steady in wind.
– Mix sizes and shapes for variety.
– Hang at different heights to create a layered look.
– Aim for gentle movement. Let the wind do the work and your yard will feel alive with ghostly figures.
Glaring ghosts are easy to set up, reuse, and store. They pair well with pumpkins, cobwebs, and lanterns for a complete spooky scene.
Next steps: plan your layout, gather sheet remnants, and test the wind on a calm afternoon to see where each ghost shines.
With a little planning, you can swap ghosts for new scenes as the season changes.
Transform your yard into a haunted masterpiece! Glaring ghosts made from simple sheets can add a spine-chilling touch to your Halloween display that your guests will never forget.
13. Terrifying Tombstones

You want a graveyard glow that makes guests pause. Here is a simple, effective way to build terrifying tombstones that feel real without breaking your budget.
Start with easy materials. Foam, cardboard, and wood each work. Foam is light and easy to move. Cardboard is cheap and quick. Wood lasts longer if you want to reuse the setup next year.
Create stone texture with spray foam. Let it dry, then paint in grays and blacks. Add lighter edges to mimic wear. A dry brush of white can imitate chalky highlights. The goal is a weathered look, not a glossy finish.
Add short, spooky epitaphs to spark a smile or a shiver. Something like “Here Lies a Kind Soul” with a twist, or a chilling line like “Rest in shadows.” You can mix serious lines with playful puns to match your yard’s mood.
Arrange your stones in clusters for a crowded graveyard feel or spread them across a wide area to cover more ground. Use a few large stones and several small ones to create depth and scale.
Light the scene with ground lights tucked at the base. A soft glow casts long shadows and makes every chip and crack stand out. Fake skeletons nearby can boost the scare, but place them where guests won’t trip.
– Tip: Use spray foam for texture, then paint with grayscale tones to get a believable aged look.
– Add eerie lights or fake plants to bring the graveyard to life in a spooky way.
– Vary stone sizes to add depth and visual interest.
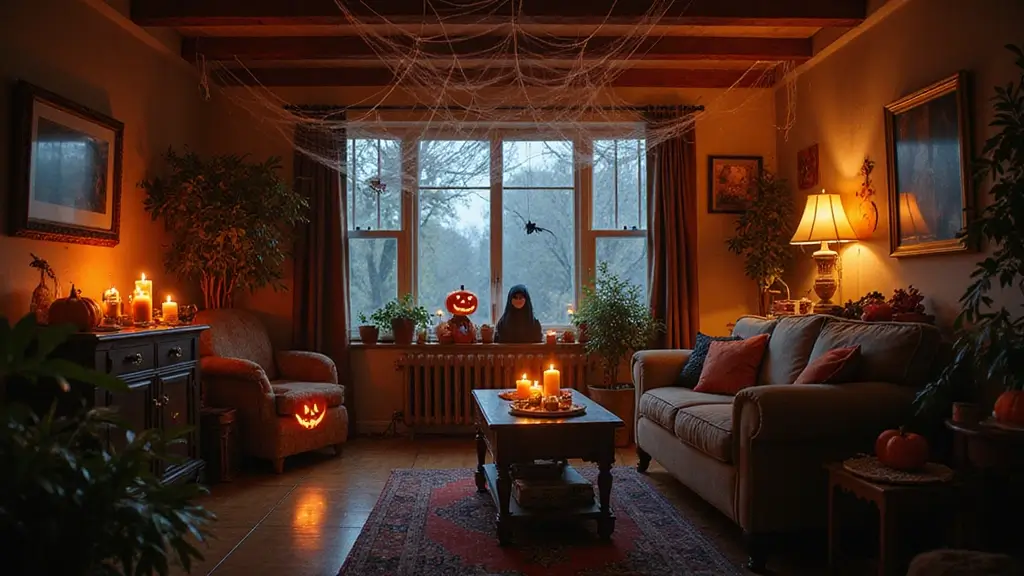
14. Creepy Coffee Table Decor

Here is why a spooky yet stylish coffee table makes your living room pop. You want a focal point that sparks talk, not a clutter trap. Let’s break it down into simple steps.
– Start with a dark cloth. It sets a moody stage and makes other pieces stand out.
– Layer in mystery items. Skulls, mini pumpkins, and spooky books set the mood.
– Add a glass cloche to show faux cobwebs or fake eyeballs.
– Light with flickering candles for moving shadows and a warm glow.
– Vary height and texture with glass, skulls, and velvet accents.
– Leave space for drinks. It is still a table after all.
Here is why changing items mid-season helps. A quick swap keeps the display fresh and avoids it looking old.
– Try swapping in a new piece every couple of weeks or as the season shifts.
Next steps: map a small display area, pick three anchor pieces, and rotate accents. With careful placement, your coffee table becomes a true Halloween conversation starter.
Tip: store a few extra pieces to swap in when the season shifts.
15. Wicked Wall Art

Here is why wall art helps you nail Halloween at home. Your walls can tell a spooky story in seconds. Start with Wicked Wall Art that captures the season without loud props. Choose canvas prints of haunted landscapes, moonlit paths, or catchy spooky quotes to set a chill mood. Swap out your usual art for Halloween pieces so your space stays fresh all month.
For a warm, personal touch, invite your family to join the project. Simple crafts like painted pumpkins, eerie drawings, or handprint bats can turn into wall art when you frame them.
– Tip: Use frames that look aged or distressed to deepen the spooky vibe.
– Tip: Mix art styles to create an eclectic look that still feels eerie.
– Tip: Pick one focal wall where your art can shine and not clash with other decor.
Next steps: measure your wall space, pick a color plan, and schedule a quick art swap each week in October. If you cannot drill, use removable hooks or clips. Look for ready-to-hang canvases from local shops or online. Dark frames or black mats help reds and oranges pop.
Keep it simple and rotate pieces from week to week to keep the look fresh without breaking the bank. Your guests will feel the season even with a subtle, stylish display.
16. Frightful Floor Mats

Frightful floor mats greet your guests and set the mood at your doorway. Choose mats with ghosts, skeletons, or pumpkins to match your Halloween theme. A welcome mat works well, and a decorative mat starts a chat.
Layer your mat on top of a larger, solid rug to boost the design. The base rug adds warmth and makes the entry feel cozy. You can switch mats through the season to keep the scene fresh.
– Tip: Pick washable fabrics so cleanup after Halloween is easy.
– Feature: Make sure the mat has a non-slip backing to stay in place when people hurry in.
Next steps:
– Choose materials that fit your entry. Rubber-backed mats stay flat; coir mats look rustic; microfiber or vinyl can handle frequent washings.
– Check size and color. A 18×30 or 24×36 mat fits most doors. Match the rug under it for a cohesive look.
– Care and storage. Shake out dirt, vacuum the mat, and launder as directed. Dry completely before reuse.
By planning a quick rotation and choosing sturdy, safe mats, your front door stays festive and inviting all season. Play with textures and colors to match your porch. Keep mats dry and wipe paws or shoes before stepping inside.
Frightful floor mats are the perfect welcome! A spooky greeting sets the tone for the season and gets everyone in the Halloween spirit. Choose washable designs for easy cleanup and keep the fright alive all month long!
17. Eerie Lighting

Eerie Lighting
Here is why you want lighting that fits your haunted theme. You need layers of light that set the mood without blinding your guests. Start with a base that feels soft but eerie.
– Use string lights to create a gentle halo along a porch rail or along a path.
– Add lanterns or caged candles for old-time charm.
Then talk about color:
Try purple, green, or orange bulbs to nudge the vibe toward Halloween. These colors work well in clusters or as accents around doors and windows.
Placement matters:
Spotlights draw attention to props like tombstones. Aim low to cast long shadows across walls. Let a single light tell part of the story.
Mix and match:
Mix several lights so the scene changes as you move. A warm string light, a bright lantern, and a flickering candle add depth.
Tips you can use today:
– Dim lights with a dimmer to switch from party brightness to spooky mood.
– Use real candles when safe, or LED candles for flicker without fire risk.
– Light the outdoors, too. A soft glow by the yard guides guests and tightens the theme.
Next steps: adjust heights and angles, and test with guests in the room so you know what reads best on camera and in person.
18. Gory Props

Gory props are a handy way to shock guests without a big budget. Fake blood, silicone limbs, and rubber organs look real enough to make people jump. Start with one strong focal piece, then add smaller touches to build the scene.
Here is why this works: a familiar thing, turned scary, hits fast. A crime-scene setup in the entry hall draws attention. A horror-movie vignette in the living room creates suspense. Use props that look real but are safe to touch. Apply blood in a few key spots, not a full mess. Keep walkways clear so guests don’t stumble.
– Plan the best spots: a dim hallway, behind a half-open door, or on a console table near the entry.
– Blend with humor: pair a gory prop with a cute element to soften the mood. A friendly pumpkin nearby helps.
– Lighting matters: bright light can dull details; a mix of soft lighting and a focused glow makes the scene feel eerie.
– Safety first: avoid sharp edges, check scale, and keep small parts away from kids and pets. Use non-toxic materials and reusable props when possible.
– Test and tweak: view the setup during the day, then at night. Move items until it reads right from the doorway.
Next steps: map your scenes, buy a few key pieces, and test them with a friend before guests arrive.
19. Vintage Halloween Decor

Want a Halloween setup that feels old and cozy? Vintage Halloween decor can make that happen. It adds a warm touch and a story to your space. You’ll see retro jack-o-lanterns, classic black cats, and old posters that remind you of spooky nights from the past.
What to collect
– Retro jack-o-lanterns in ceramic or tin, with soft, faded colors.
– Classic black cat figures or silhouettes that stand on shelves or mantels.
– Old-style prints or postcards with Halloween scenes.
– Glass bottles or tins with vintage labels for a desk or doorway display.
Where to find them
– Check thrift shops, flea markets, and estate sales for real pieces.
– Look for DIY options you can recreate with simple paints and stencils.
– Inspect items for sturdy parts, and clean them gently before using.
Mix with modern accents
– Pair a weathered piece with a clean, simple lamp or a sleek black frame.
– Use one vintage item as the star, then add a few current pieces around it to balance the look.
– Keep color simple: whites, creams, and muted oranges help the old pieces pop.
Display ideas
– Create a dedicated shelf or mantel that guests can walk by.
– Place items at eye level so they’re easy to notice.
– Use shadow boxes or frames to highlight prints and cards.
Next steps: start with one or two finds, then expand your display as you gather more pieces.
20. Scary DIY Wreaths

Want a scary wreath that greets guests but still feels welcoming? A scary DIY wreath is a fun, doable Halloween project. It sets the mood and saves you from a bland front door.
What you’ll need
– Gather a grapevine wreath as the base.
– Collect faux spiders, mini pumpkins, and black flowers for a bold look.
– Pick a spooky sign or eerie phrase that fits your vibe.
– Have floral wire and hot glue ready for strong attachments.
– Add glow items or subtle lights to boost the scare after dark.
Step by step
– Here is why it works: plan where the big pieces sit first.
– Attach the largest decorations with floral wire, then secure with glue.
– Fill gaps with smaller pieces to create depth and texture.
– Position the sign where it’s easy to read, then fix it in place.
– Make some elements removable so guests can rearrange them.
– Hang the wreath on your door and enjoy the immediate fright and delight.
Outdoor durability
– Use weather-resistant materials if the wreath will stay outside.
– Seal exposed glue with clear spray to help it last.
– Store the wreath indoors when not in use to extend life.
Fresh ideas
– Try glow-in-the-dark paint on eyes or pumpkins for extra pop.
– Switch colors to suit your porch style.
– Add a motion-activated element for a sudden surprise.
21. Scary Sound Effects

Here is how to use scary sound effects to thrill your Halloween crowd. Sound can pull guests into the scene without a big spend.
– Placement Hide small speakers around entryways, behind curtains, or inside your décor. Place one near the stairs and another by the couch. Wireless options make this easy. Run cords along baseboards to stay hidden and safe.
– Sound choices Pick creaks, ghost whispers, distant thunder, clanks, and soft moans. Build a short loop of 60 to 90 minutes for the night. Add a few quick tunes to lift energy when talk slows.
– Timing Start with subtle sounds as guests arrive. Slowly raise the volume as the room fills. Let a quiet moment sit after a loud cue so conversations can happen.
– Triggers Use motion sensors or footstep cues to trigger a sound when someone passes by. It feels natural and sparks a small scare.
– Balance and safety Test in a quiet room first. Then test with ambient noise. Keep cables neat and out of the way. If you use cords, tape them down.
– Pair with visuals Sync sounds with flickering lights, moving props, or a fog effect for a fuller scene.
– Next steps Make a simple playlist today. Map out where to place speakers. Do a daytime test, adjust levels, and save your setup for party night.
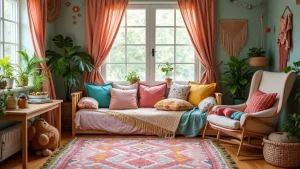
22. Spooky Themed Pillows

Want a quick Halloween upgrade for your living room? Start with spooky themed pillows. They add soft comfort and a bold spooky vibe with almost no work. You can pick ghost designs, pumpkins, or playful skulls to wake up sofas and chairs. Mix patterns to keep things lively. Use colors like black, orange, and deep purple to tie the look together.
Think about fabric. Cotton covers stay easy to wash. Velvet feels rich and cozy. Look for removable covers so you can wash them after the season ends. A hidden zipper helps. Durable fabrics stand up to daily use. Here is why this works. Pillows add color and texture.
These spooky themed pillows switch in and out with your regular ones, so your room can shift from cozy to eerie in minutes. Set a small color plan. Lead with black, orange, and purple accents.
– Tip: Removable covers make washing after the season easy.
– Arrange pillows in clusters on sofas and chairs for a warm Halloween look.
– Try shapes and sizes to add texture.
– Consider textures like velvet, knit, or faux fur for depth.
Place a set on the couch, one on an accent chair, and a small stack on a coffee table.
Store the used covers in a labeled bin so you can find them next year.
Next steps: choose 2 to 4 pillow covers, pick a color mix, and place them where guests sit.
23. Haunted Mirrors

Haunted Mirrors for Spine-Tingling Decor
Looking to add a quick, budget-friendly scare? You can use haunted mirrors to pull off ghostly reflections that catch guests off guard. Start with an old mirror you own, or apply mirror paint to create a foggy, faint image. Pair this with dim lighting to soften the room and heighten the eerie mood.
– Where to place: Put the mirror in a surprising spot, like behind a door.
– How to style: Frame the glass with cobwebs, dark artwork, or a dusty frame.
– Lighting tricks: Use a light source behind the mirror to cast a glow that shifts as people move.
– Height and angle: Hang mirrors at different heights to create odd, eye-catching angles.
– Make it interactive: Invite guests to share a quick spooky story about the “haunted” mirror.
Next steps: test the setup in a hallway or entryway, adjust lighting, and watch how the space changes.
24. Creepy Chess Set

You want a Halloween decor that also gives your guests something fun to do. A creepy chess set can do both. It adds mood and doubles as a game people can play between scares.
Here is how to make the most of it.
– Piece ideas Choose spooky looks like skeletons, vampires, or monsters. Use mini figures that fit chess squares.
– Board and color contrast Use a dark board so pieces pop. Add bright colors or glow in the dark paint on the bases.
– DIY option If you craft, use Halloween figures as the pieces. Attach them to small bases and seal so they last.
– Setup tips Place the board where guests can reach it. Light it with a lamp or safe candle. Play soft eerie music to set the mood.
– Fun twists Offer small prizes for winners. Use short rounds so everyone plays. Add a spooky rule like a ghost move once per game. It works for kids and adults alike.
This combo of looks and play keeps the vibe playful, not too scary. If you buy a ready made set, you can still tailor it with paint to match your party colors and theme.
25. Monster Mugs

Monster mugs
Want a fun twist for Halloween drinks? Monster mugs add color and charm to your party. Pick mugs shaped like monsters, pumpkins, or ghosts. They work great for hot cocoa, witch punch, or apple cider. These pieces spark conversations. They also store well.
Here is why they shine: they turn simple drinks into a themed experience. You can set up a quick drink station so guests mix their spooky sips. Put out a tray with mugs, toppings, and recipe cards. This setup is quick to reuse next year. It starts conversations.
If you love crafts, try painting your own mugs. Use ceramic markers or non-toxic paints. Draw bats or candy corn. Let it dry, then bake according to the paint maker’s directions. The result is a personal touch that makes your party feel special.
– Tip: Add fun straws or drink stirrers to boost playfulness.
– Tip: Display mugs on a tiered rack to catch the eye.
– Tip: Let guests take home their mug as a party favor.
– Tip: Use clear glass mugs for a spooky glow when light hits them.
Care tips: Hand wash to protect designs and avoid the dishwasher. Store mugs in a cozy shelf so they stay ready for next Halloween. They wash up easy when you keep the designs simple.
Sip, smile, and scare! With monster mugs, every drink becomes a Halloween delight that sparks conversations and creativity at your spooky soiree. Cheers to making memories with your scary Halloween decorations!
Conclusion

With these 25 spooktacular decorations, your home will be the talk of the town this Halloween! Each piece not only adds a creative flair but also sets the perfect atmosphere for spooky gatherings.
Don’t hesitate to mix and match these ideas to create a unique blend that reflects your style. Embrace the spirit of the season and have fun transforming your space into something frightfully beautiful!
Frequently Asked Questions
What Are Some Easy Scary Halloween Decorations I Can Make Myself?
If you’re looking for easy DIY decor, try making spooky themed pillows or scary DIY wreaths to greet your guests. These projects are simple and require minimal supplies, allowing you to add personalized touches without a lot of hassle.
For a quick fright, consider crafting creepy candle holders or sinister spider webs that can be set up in no time!
How Can I Create a Spooky Atmosphere for My Halloween Party?
Transform your space with a mix of scary Halloween decorations like haunted portraits and eerie lighting. Utilize gory props for shocking moments and set up terrifying table settings to impress your guests.
Don’t forget to play some scary sound effects in the background to pull everyone into the spooky vibe!
What Are Some Budget-Friendly Halloween Decoration Ideas?
You can achieve a spooky look without breaking the bank! Consider using chilling window silhouettes to transform your home’s exterior, or create terrifying tombstones for your garden using basic materials.
Inflatable figures and goblin garlands are also great choices that add fun and fright with minimal cost!
What Should I Consider When Choosing Halloween Decorations?
Think about your overall theme and how each piece will contribute to the atmosphere you want to create. Go for a mix of scary decorations like sinister skeletons and ghoulish garden statues to keep things interesting. Also, consider the ease of setup and whether you prefer DIY options or ready-made decorations that can quickly elevate your space!
Can I Mix Cute and Scary Decorations for Halloween?
Absolutely! Mixing cute and scary decorations can create a fun and inviting atmosphere. Consider using bewitching banners alongside sinister spider webs or monster mugs on your table. This balance allows for a festive vibe while still embracing the spooky spirit of Halloween!