20 DIY Garden Projects That Will Transform Your Backyard into a Paradise (You Won’t Believe #15!)
This season has me craving a backyard that feels calm, welcoming, and easy to care for. I want a space you can enjoy after a long day, without a full day of work every weekend. So I pulled together 20 DIY garden projects that can turn any yard into a paradise. You’ll see ideas that use simple tools, thrift store finds, and a little elbow grease. And yes, number 15 will surprise you.
If you love quiet mornings, warm sun, and spaces that invite you to linger, this post is for you. It’s for people with small yards, renters who want a pretty fix, and anyone who wants big results with small effort. If you care about practical steps, clear instructions, and real projects you can finish in a weekend, you’re in the right place.
When you read, you’ll get a clear plan for twenty DIY garden projects that cover seating, beds, lighting, paths, and little touches that add up. Each idea includes easy steps, a rough cost, and a simple list of materials so you can shop once and start soon. You’ll learn how to make a raised bed from blocks, build a cozy pallet bench, lay a simple stone path, and add warm lighting for nights outdoors. The set is designed to fit any space, from a balcony to a full yard.
Plus, you’ll get a peek at the most surprising idea, number 15, that shows you can get big results with small changes.
Here is why this guide works. Start small. Pick two projects you can finish this month. Check the space you have and the tools you own. Set a loose budget and a simple materials list. Then plan a couple of hours on a weekend to start. Slow progress beats no progress, and you can adjust as you go.
Now is the time to act. Imagine stepping outside to a yard that feels like a retreat. Your backyard paradise begins with a single project. I’m excited to see which idea you pick first, and I’ll be right here with tips if you get stuck. Ready to turn your outdoor space into a place you actually want to spend time in? Let’s get started.
1. Upcycled Pallet Planters

If space is tight, try upcycled pallet planters. They hang on a wall or fence and keep the floor clear. They’re quick to build and add a rustic touch to your garden. Sand the pallet smooth, seal it, and color it with paint. They save space and let you stack plants high.
Here is how to start
– Choose a sturdy pallet that is clean and safe for soil.
– Remove splinters until the wood feels smooth.
– Line the inside with landscaping fabric to hold soil.
– Drill a few drainage holes for water to escape.
– If you like, add wheels or a small stand to move it.
Fill with a ready potting mix. Add a bit of compost if you have it. Create pockets or tiers by placing boards to form sections, or stack two pallets. Plant herbs such as basil and thyme, flowers like nasturtium, or compact greens like lettuce.
Care tips
– Check for loose boards after rain and tighten screws.
– Use light, well-draining soil so the pallet stays steady.
– Move the planter on a dry day to avoid muddiness.
This upcycled project brings color and life to your yard. It’s affordable, easy to do, and great for growing kitchen herbs or small veggies at eye level.
2. Fairy Garden Creations

Want a small, magical spot right in your yard? A fairy garden fits on a balcony, windowsill, or sunny corner. You shape it with plants, stones, and tiny decorations, then watch the scene come alive.
Here is how you build it. Pick a container or a patch. Make sure the soil drains well. Use potting mix with a pinch of sand.
Choose small plants. Succulents stay tidy with little care. Moss adds a soft green layer. For color, try creeping thyme or tiny ferns.
Add the magic. A shallow dish can hold a tiny pond. Place miniature figurines, a bench, and a bridge. Create paths with pebbles. Use twigs and moss for trees or fences.
Ideas to Enhance Your Fairy Garden:
– Use succulents for easy maintenance.
– Incorporate natural elements like twigs and moss.
– Create pathways with colorful pebbles.
Care and upkeep. Water sparingly. Give sun or shade as needed. Refresh decorations with the season.
Start small. Move items to test layouts. Use lightweight planters so you can change the look easily.
Why it helps. It sparks imagination, teaches basic gardening, and gives you a calm corner to enjoy with family.
This little project pays off with big smiles and a tiny paradise you can visit daily.
3. Stone Walkway with Character

Your backyard path feels dull, and rain often leaves mud on your shoes. A stone walkway changes all that. It adds quiet charm and guides guests along the best spots in your garden.
This DIY path is easy to pull off with common materials. Flat stones laid in a playful pattern give your space character. Mix shapes, sizes, and colors to fit your style. It looks timeless and can work with many budgets. And when the ground stays wet, you’ll see less mud on your feet.
Next steps.
Execution Steps:
1. Plan the path layout using a garden hose or string so you know the route.
2. Dig a shallow trench where each stone will sit.
3. Set the stones and fill gaps with gravel or sand for stability.
4. Edge the path with low plants or tiny flowers to soften the line.
A stone walkway is practical and pleasant to walk on. It adds texture to the yard, cuts wear on the grass, and invites people to explore your garden. With a little care, you can keep it clean and safe all year long. Add a strip of moss along the edges to soften the look and make the path feel like part of the place.
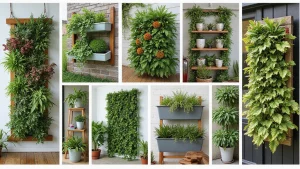
4. Vertical Herb Garden

Stuck with a tight balcony or a busy kitchen and no herb garden? A vertical herb garden fits in small spaces. It hangs on a sunny wall and puts fresh leaves within reach. You can cook with basil, thyme, and rosemary without stepping outside.
Next steps: choose a sunny spot by the kitchen window. Hang wall planters that are light in weight so the wall stays strong. Pick planters with built-in drainage or add drainage holes. Use a frame or rail system that holds several pots in a tight stack.
Plant choices work best when you mix herbs that like sun and simple care. Basil loves sun and fresh air. Thyme handles heat well. Rosemary stays compact when pruned. You can also add chives or mint, but keep mint in check to stop spreading.
DIY Tips:
– Use lightweight containers to avoid overloading the wall.
– Ensure good drainage to keep herbs happy.
– Mix and match herbs for color and fragrance.
Keeping the garden healthy is simple. Water in the morning so leaves dry before night. Pinch back when stems get long to keep a dense, bushy look. Harvest leaves as you cook; this keeps the plants productive.
This setup brings fresh flavors to your kitchen and adds a neat look to any outdoor space.
Even the smallest spaces can bloom with life! A vertical herb garden brings fresh flavors right to your kitchen, proving that you don’t need a large backyard to cultivate your green thumb.
5. Garden Trellis for Climbing Plants

You want vertical interest in your garden. A DIY trellis does it with ease. It adds height, guides climbing plants, and gives a plain wall a green focal point.
Here is why a trellis is worth your time. It saves space and keeps vines off the ground. It also adds a clean, tidy look as plants rise up.
Materials and design
Wood or metal both work. Wood is easy to cut and quick to build. Metal is strong and slim. Paint or stain to match your shed, fence, or the color of your blooms.
Where and how many
Place the trellis along a fence, near a path, or in a sunny corner. A 4 to 6 foot tall setup fits most backyards. Choose a frame width that fits your space and the plant’s reach.
Building Your Trellis
– Pick materials based on the plants you’ll support.
– Secure the frame deep in the ground with sturdy stakes.
– Train your vines to climb as they grow.
As vines wrap the frame, you’ll see a green wall take shape. A trellis adds height and texture, helps airflow, and can brighten a corner of your garden.
Install this weekend and watch your garden glow.
A DIY garden trellis not only saves space but also creates a stunning vertical display that draws the eye. Let your climbing plants thrive and transform a plain wall into a lush focal point!
6. DIY Garden Bench

You want a comfy, sturdy seat in your yard that fits your space and budget. A DIY garden bench makes that possible. It gives you a quiet spot to breathe, read, or chat with friends right outside your door. Built from reclaimed wood or pallets, it adds charm and becomes a natural centerpiece in your garden. You can tailor it with paint or cushions to match your style and the season.
Materials and style are up to you. Reclaimed boards bring a warm, rustic look. Pallets offer a fast, budget-friendly option. Sand every edge smooth. Seal the wood so it lasts through rain and sun. Pick a finish that hides wear. You can leave the wood natural or choose a soft paint color. Cushions add comfort and a splash of color that ties your garden together.
Construction Steps:
1. Plan your bench design and gather materials.
2. Assemble the frame securely.
3. Sand and finish the wood to prevent splinters.
Pro tips you can use today: choose weatherproof screws for strength, and add a simple backrest if you like support on long sits. For a quick look, stain and seal all at once; for a bold look, paint the bench first, then seal. Here is why it matters: a well-built bench lasts, so you spend less time fixing it and more time enjoying your garden. Next steps? Start with a small test bench to check balance, then scale up to a full-length version with cushions and a matching side table.
7. Colorful Mosaic Stepping Stones

You want a garden path that adds color without breaking the budget. Colorful mosaic stepping stones do that. They turn a plain yard into a place you want to walk.
What you need
– Concrete mix and water
– A mold with a non-stick coating
– Broken tiles, glass, or bright ceramic scraps
– A level cure surface and a spray bottle for moisture
– Optional grout and sealer for grip and shine
Step by step
1. Lightly coat the mold with oil or spray so the stone pops out later.
2. Mix concrete until it feels like thick peanut butter.
3. Fill the mold and smooth the surface.
4. Place mosaic pieces on the wet concrete. Press gently so they sit even.
5. Let the stone cure in the mold for 24 to 48 hours, depending on weather.
6. Remove the stone and let it dry completely on a rack. If you want, add grout between pieces and seal the surface.
Placement ideas
Line a path with a playful zigzag, or tuck stones among flower beds for bright accents. Mix sizes and shapes for a friendly, natural look.
Care and tips
Store loose pieces for later projects. Don’t rush drying in hot sun or at freezing nights. Expect tiny cracks in cold weather; they can add character, not ruin.
| Project | Materials | Estimated Cost | Tips |
|---|---|---|---|
| Upcycled Pallet Planters | Pallet, landscaping fabric, potting mix | $20 | Check for sturdy pallets and ensure good drainage. |
| Fairy Garden Creations | Container, small plants, figurines | $30 | Use succulents for easy maintenance and incorporate natural elements. |
| Stone Walkway | Flat stones, gravel or sand | $50 | Plan layout with a garden hose and fill gaps for stability. |
| Vertical Herb Garden | Wall planters, herbs, potting mix | $40 | Choose lightweight containers and ensure good drainage. |
| Garden Trellis | Wood or metal, screws | $60 | Secure the frame deep in the ground and train vines to climb. |
| DIY Garden Bench | Reclaimed wood or pallets, screws | $70 | Sand edges smooth and seal wood for durability. |
| Succulent Wreath | Wire frame, small succulents, moss | $15 | Water sparingly and give bright, indirect light. |
8. Water Feature for Tranquility

You want a calm space in your yard. A water feature can give you that. It might be a tiny pond, a simple fountain, or a bubbling rock. You don’t need a big project to make a big difference.
Water brings more than sound. A gentle flow hushes street noise and invites you to slow down. The moving water catches the eye and guides your gaze. Plants around the edge add color and hide the liner, so the feature looks natural. You’ll feel the air cool a little where the spray lands. And you’ll notice birds and butterflies visiting the water.
Quick-start tips
– Pick a spot you can watch from a chair or patio.
– Use a waterproof liner if you go with a pond.
– Choose a small pump and filter that fit your space.
– Plant around the feature for natural beauty and soft edges.
– Start simple; you can add extras later.
If you want ideas, think of three styles: a shallow pond with a gentle ripple, a raised fountain with a clear jet, or a bubbling rock for a natural touch. Materials matter too: liner or tub, a pump, tubing, rocks, and some resilient plants. Lighting at dusk adds magic without a big cost.
Maintenance is easy but steady. Clean leaves and debris weekly, check the pump for clogs, and top off water to keep the level. In cold areas, winterize or cover the feature to avoid cracks.
Next steps: plan your space, pick a style, gather basic parts, and test for sound and view. Your backyard can feel calmer in days, not weeks.
9. Hanging Garden Baskets

If you want color up where you can see it every day, hanging baskets are a smart move. They add life to porches, fences, and even trees without taking over your ground space. Here is why they work so well: they’re quick to put up, easy to swap out, and they make your garden look full and lush fast.
Here is how to get great results:
– Choose light, sturdy baskets with good drainage. Look for lightweight plastic or resin styles or woven baskets that won’t sag when you water.
– Plan a mixed plant palette mix flowering plants, small succulents, and trailing vines. This combo keeps color steady and adds texture.
– Match sun needs to your spot Most baskets like bright light for several hours. If you have shade, pick shade-tolerant greens and blooms.
– Mount securely Use strong hooks or brackets rated for weight. Test their hold with a gentle tug before you fill.
– Water and soil care Check soil daily in heat. Water until you see moisture at the root zone without soggy soil.
– Healthy maintenance Deadhead spent flowers and trim leggy stems to keep the display tidy.
– Seasonal swaps Refresh with new colors each season to keep the look fresh and inviting.
– Create a focal wall Group two or three baskets at different heights for a striking vertical garden.
Next steps: pick a sunny spot, gather lightweight pots, and start with a small trial run to learn what your plants love.
10. DIY Compost Bin

You want a simple way to turn kitchen scraps into rich soil. A compost bin does both. It cuts waste and feeds your plants.
Choose how to build. A quick option is pallets tied with string or wire. It creates a three-sided bin that leaves air in. If you prefer, buy a ready-made unit. Either choice gets you started fast.
Find a good spot. Pick a shady, level corner. It stays out of the way, but you can still reach it easily. A touch of sun helps, but too much heat can dry it out.
Composting Tips:
– Add kitchen scraps like vegetable peels, fruit cores, and coffee grounds.
– Mix in yard waste such as dry leaves, grass clippings, and small prunings.
– Turn the pile every few weeks to mix in air and speed up decay.
Keep it in balance. The greens are the wet, nitrogen-rich stuff. Brown materials feed the pile with carbon. A good mix looks and smells earthy, not soggy or foul.
Over time you will see worms at work and a sweet earthy scent in the bin.
Next steps: keep scraps coming, watch the texture, and your garden soil will grow richer over time. A compost bin helps you waste less and gain better soil for seeds and plants.
11. Natural Garden Edging

You want a garden border that looks natural and keeps mulch from spilling into flower beds. Natural edging does that with simple materials you already have. Stones, logs, or bricks can frame your beds and give your yard a tidy, finished look. This kind of edging is tough, easy to install, and gentle on your plants.
Edging ideas:
– Flat stones create a sleek, modern line.
– Logs bring a rustic charm.
– Bricks offer a classic feel.
– Mix materials for a one of a kind border.
A clear edge helps your plants stand out and makes trimming easier. It also stops soil and mulch from creeping into the paths.
Here is how to do it:
1) Mark the line where you want the border. Use a string and spray paint or a chalk line.
2) Dig a shallow trench about 2 to 3 inches deep. This gives the edging space to sit.
3) Place the material along the trench. Tap stones or bricks with a hammer to level them.
4) Fill gaps with soil or gravel and press mulch up to the edge.
5) Check the border every season. Reset any stones that shift after heavy rain.
Maintenance tips: Keep a thin edge of mulch and soil flush with the border. Weeding between pieces is easier with space to move.
If you want extra pop, plant a thin line of low ground cover along the border. This softens the edge and makes the border feel part of the garden.
A well defined edge draws the eye to your plantings and protects beds from foot traffic and weed invasion. With light care, this natural border stays neat year round.
12. DIY Garden Art

You want a yard that feels like you. DIY garden art makes that happen in simple steps. It adds color and texture while showing your taste. Best of all, you can finish many projects in a weekend and still have time to enjoy the garden.
Art ideas
– Paint and decorate stones. Pick smooth rocks, bright paints, and easy patterns. After painting, let them dry in sun or a warm spot. Seal with outdoor varnish so colors stay bright through sun and rain.
– Craft sculptures from metal scraps. Tie or glue old tools, nuts, bolts, or spoons into playful shapes. Start small and add a simple wire frame for strength. Wear gloves for protection and use a safe workspace.
– Make wind chimes. Use metal lids, keys, shells, or beads. String them on a sturdy cord or fishing line. Hang them from a strong branch or fence post for good sound.
– Build a bird feeder or small house. A simple design welcomes birds and adds life. Choose weatherproof wood and easy-to-clean interiors. Mount away from predators for safety.
Here is why these ideas work. They reuse items you already have, keep costs down, and invite family help. You also gain a personal touch that fits many garden styles.
Next steps: gather a few rocks, a can of paint, a scrap metal piece, and a length of cord. Start with one piece, then add more as you like. Test outdoors and rotate art with the seasons.
13. Cozy Fire Pit Area

You want a warm, inviting place for evenings with friends and family. A DIY fire pit can be the heart of your yard. Pick a style you like. A stone circle, a metal bowl, or a low built-in ring; each gives a different feel. Here is why you should choose something you can build with your hands.
Next, plan the space. Pick a flat safe area away from branches and structures. The ground should be level so chairs stay steady. Size the pit to fit your space and the people you host.
Materials and build. For stone, you stack a small ring and line it with sand. For a metal bowl, set it on a fireproof base and add a border of brick or pavers. Use fireproof grout if needed. Have a bucket of water or a sand bag nearby.
Set the scene. Arrange seating in a circle or horseshoe. Add a small outdoor rug and lighting like string lights. A grate cover or screen helps.
Safety Considerations:
– Keep the pit away from trees and overhangs.
– Use fireproof materials and a sturdy base.
– Always have water or sand within reach.
A fire pit brings warmth to your backyard.
14. Raised Garden Beds

You want a garden that’s easy to manage. Raised beds do that. They keep soil in place, drain well, and slow erosion. They lift the growing space, so knees and backs feel less strain. Build them from wood, bricks, or repurposed materials. Fill with vegetables or flowers, and watch them thrive.
What you gain
– Better drainage and soil control.
– A contained space with fewer weeds.
– Easier watering.
– Reach with less strain.
Raised beds warm up early and dry out evenly, which helps roots grow. Put beds in sun most of the day.
Materials and design
Wood has a warm look. Bricks or blocks last long. Choose height 12 to 24 inches. Make beds narrow enough to reach from both sides.
Building tips
– Choose sunny spot.
– Use untreated wood.
– Ensure bottom drainage.
– Line with landscape fabric to slow weeds.
Fill and plant
Fill with a mix of topsoil and compost. Add a bit of sand or perlite for drainage. Plant what you love; greens, tomatoes, peppers, or flowers. Mulch to keep moisture in and weeds down.
Here is a simple starting plan: a 4-by-8 bed fits many yards. You can add more later. Rotate crops; refresh soil with compost yearly. Mulch helps.
15. Stunning Garden Arches

Need a welcoming entrance to your yard without a lot of fuss? A garden arch fits the bill. It creates a natural doorway, frames a path, and gives climbing plants a place to grow. The result is a charming moment as you walk into the garden.
Here is why it works: It adds height to a flat corner, brings shade and scent, and guides your eye to the heart of your space.
Materials you can use:
– Wood for a warm, classic look.
– Metal for a slim, sturdy frame.
– PVC for a light, budget-friendly option.
Next steps are quick.
Building process:
1. Decide on the height and width based on your garden layout.
2. Secure the arch well to withstand wind.
3. Train plants to climb and cover the arch.
Finish with a splash of scent by adding roses, clematis, or jasmine on the arch. A garden arch becomes a warm welcome and a natural focal point that invites people to explore your yard.
A stunning garden arch transforms your backyard from ordinary to extraordinary! It not only serves as a beautiful entrance but also invites nature to play a part in your outdoor oasis.
16. Vertical Garden with Recycled Bottles

Running out of space but craving fresh herbs? A vertical garden built from recycled plastic bottles can bring life to a wall without stealing floor room. It makes use of waste and adds a playful touch to your yard on a fence or shed. You can grow basil, mint, thyme, and small greens in a tight space.
Steps to Create:
1. Trim each bottle in half and smooth the edges. Drill small drainage holes in the bottom so excess water can escape. Keep the edges safe with a quick sand.
2. Mount the bottles to a wooden frame. A simple pallet, an old fence panel, or a lightweight frame works well. Leave a little gap between bottles for air to move.
3. Fill each bottle with potting mix and plant your favorites. Water gently and evenly so you don’t wash soil out. Group herbs with similar sun needs together for easier care.
This setup gives you a neat, space-saving herb wall that tucks into tight yards and balconies. It also shows you can reuse plastic in a smart way.
Tips and practical notes:
– Paint bottles to add color and make the garden stand out.
– Label herbs with small pieces of tape so you know what’s in each cup.
– Place the frame where it gets enough sun for the chosen plants.
– Check soil moisture about once a week and water as needed.
Next steps: hang the frame, plant, and enjoy fresh greens all season.
17. Garden Shed Makeover

You want a shed that adds to your yard, not just holds things. A shed can be a calm corner, a potting nook, or a light place to read. It does more when you plan it. With small steps, you gain space and joy in your outdoor space.
Makeover Ideas
– Add flower boxes to the windows. They catch sun, make the shed look alive, and bring a scent of soil.
– Paint the shed a bright, friendly color. Yellow, mint, or sky blue can lift the mood.
– Install shelves or a pegboard. Store pots, seeds, and tools where you can reach them easily.
– Build a small potting bench. A hard work surface helps you transplant seedlings.
– Create a tiny seating nook. A chair or bench gives you a perch to enjoy your work.
– Decorate with garden-themed art. A sign, a pressed leaf, or a pretty map adds charm.
– Add solar lights or a string of bulbs. It helps you work at dusk and makes the space warm.
– Weatherproof it. Seal cracks and use water-safe paint so it lasts.
Next steps to make it real:
– Plan the layout on paper. Decide if you want a potting zone, a storage wall, or a reading spot.
– Gather basics. Paint, nails, shelves, weather seal, and a stiff brush.
– Start small. Do one shelf or one window box first to test your plan.
With these moves, your shed becomes a true part of your garden. It stays handy and invites you outside.
18. Succulent Wreath

Want a doorway that feels alive with little effort? A succulent wreath brings color and calm to your home year round.
What you’ll need
– A wire frame or straw base
– A mix of small succulents (Echeveria, Sedum, Haworthia, Crassula)
– Floral wire or non-toxic glue
– Pruners or scissors
– Sphagnum moss or soft filler to hide the base
Here is why these parts help: the frame shapes the wreath, moss hides rough edges, and succulents stay light and easy to care for.
Steps to build
1) Prepare the base. If using straw, dampen it slightly so you can press moss in and cover gaps.
2) Plan the layout. Place the succulents on the frame to see where each will sit.
3) Anchor the big plants. Start with two or three larger succulents and secure with wire or a dab of glue.
4) Fill the gaps. Add smaller cuttings around the anchors for a full look.
5) Finish and hide. Tuck moss around the edge to cover the frame.
6) Quick care. Water sparingly and give bright, indirect light.
Display and care
Put your wreath where it gets good light but not hot sun. Trim any dry leaves and rotate the frame every so often so it grows evenly. With light upkeep, your succulent wreath stays fresh and welcoming for a long time. Next steps: switch in a few new cuttings for variety or try a different base style.
19. Butterfly Garden

If you love butterflies, a small butterfly garden can bring bright color and life to your yard. A sunny spot draws them in best. Plant nectar-rich flowers to feed adult butterflies. Add host plants so caterpillars have food. Include grasses and shrubs to give butterflies shelter from wind and sun. Plan blooms so there is something blooming most of the year.
Plant Selection:
– Native plants work best for local pollinators.
– Include host plants for caterpillars.
– Plan for steady blooms through spring, summer, and fall.
Try a mix of plant heights so the butterfly garden feels layered. Group blooms in clumps to make it easy for butterflies to sip nectar. Keep the area free from strong pesticides that harm insects. Water at the base of plants to avoid leaf wetting.
Next steps: plan sun, nectar, host plants, and water.
Care and maintenance:
– Water deeply once or twice a week in dry weather.
– Mulch around each plant to keep soil moist.
– Add a shallow water dish for drinking.
– Trim spent blooms to encourage new ones.
– Start small and watch how butterflies visit.
– Your garden stays bright all season.
Transform your backyard into a butterfly haven! Plant nectar-rich flowers and host plants to create a vibrant ecosystem that brings joy all year long. Nature’s beauty is just a garden away!
20. Edible Flower Bed

If you want a garden that looks great and feeds you, try an edible flower bed. It blends beauty with taste in one space. You can munch on blooms while you cook. Roses, nasturtiums, and violets are easy to start with. Others like calendula, pansies, borage, or chive blossoms add color and scent.
Here is why it works for you.
– Choose flowers labeled edible and grown without pesticides.
– Plant in full sun so they bloom through the season.
– Mix blooms with leafy greens or herbs for color and flavor.
– Harvest when buds plump and petals look fresh for best taste.
Next steps: plan the bed so color and height flow from back to front. Keep a simple calendar for bloom times and harvest days.
Design and care tips
Plan the bed like a simple rainbow. Tall blooms go in the back, small ones up front. Put herbs nearby so you can snip both at once. Space enough room for bees and for new blooms to fill in.
Safety and use
– Wash flowers gently in cool water before using.
– Remove any flowers treated with chemicals.
– Start small and expand as you learn what tastes best.
Next steps: sketch your layout, pick 3–5 edible varieties, and write a light harvest plan.
Conclusion

Embarking on these DIY garden projects will not only beautify your backyard but also provide a fulfilling creative outlet.
Each project offers an opportunity to connect with nature and enjoy the satisfaction of building something special with your own hands.
So grab your tools and start planning your transformation today!
Frequently Asked Questions
What Are Some Easy DIY Garden Projects for Beginners?
If you’re new to gardening, starting with easy DIY garden projects is a great idea! You can try making upcycled pallet planters or a vertical herb garden. Both projects require minimal tools and can be completed in a weekend, giving you quick results and a sense of accomplishment.
Don’t hesitate to dive in; gardening should be enjoyable, and these simple projects will help you connect with nature!
How Can I Make My Small Backyard Look Bigger with DIY Projects?
To make your small backyard feel more spacious, consider incorporating vertical garden ideas like a garden trellis for climbing plants or hanging garden baskets. These projects draw the eye upward, creating the illusion of more space.
Additionally, a stone walkway can guide visitors through your garden while adding charm and functionality, helping your space feel more cohesive and open.
Are DIY Garden Projects Cost-Effective?
Absolutely! DIY garden projects can be incredibly cost-effective. For instance, using materials like recycled bottles for a vertical garden or natural garden edging made from stones or logs can save you money while adding unique character to your garden.
By getting creative and using items you already have, you’ll not only save cash but also personalize your outdoor space.
What Materials Do I Need for DIY Garden Projects?
The materials you’ll need depend on the specific project, but many DIY garden projects use common items such as wood pallets, soil, and plants. For example, to create a DIY compost bin, you might need old pallets or wire, while a succulent wreath requires a wire frame and small succulents.
Check your garage or local thrift store for supplies, and don’t forget to have fun while gathering your materials!
How Do I Choose the Right DIY Garden Project for My Space?
Choosing the right DIY garden project depends on your space, time, and style! Start by evaluating your backyard size and sun exposure to determine what will thrive. For smaller areas, consider projects like a vertical herb garden or hanging baskets. If you have a bit more room, a raised garden bed or cozy fire pit area could be perfect!
Ultimately, pick projects that excite you and align with your vision for transforming your backyard into a paradise.