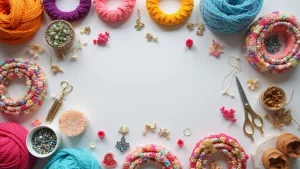
19 Fashion DIY Projects That Will Transform Your Wardrobe (And Save You Money!)
This season has me craving simple, budget-friendly ways to refresh outfits. My closet is full of pieces I love but rarely wear. So I made this post to help you get more life from clothes you already own, without the rush of shopping or the big price tag. You’ll find ideas that are easy to try on a weekend and friendly to beginners.
If you care about looking good without wasting money, this one’s for you. If you enjoy doable DIYs, upcycling, and turning old pieces into something fresh, you’ll feel right at home here. These ideas are meant for real closets and real days, not perfection.
I pulled together nineteen fashion DIY projects that are simple, quick, and actually fun. Each idea uses materials you likely have on hand, or you can grab cheap from a thrift shop. From small tweaks to bigger updates, they help you remix what you own into pieces that look personal and new.
What you’ll get is practical guidance you can use right away. You will get clear steps, a short materials list, and tips to avoid common mistakes. You’ll learn how to hem a pair of jeans, add patches, dye a tee, or stitch a tiny embroidery detail. You’ll also pick fabrics that wear well and finish seams so the work lasts.
These projects save money and cut waste. They put you in control of your look, so you can wear outfits that fit your style and mood. Start small with a simple hem or a patch on a denim jacket, then try a tie-dye twist or a fresh embroidery accent. Best of all, most steps use a basic sewing kit, fabric scissors, and a little care with your supplies.
Next steps are simple. Pick one project that matches what you already own, gather a few supplies, and give it a try this weekend. Take a before photo, note what you learned, and tweak as you go. If you want, share your results so others can get inspired too.
1. T-Shirt Tote Bags

Are you looking for a quick, cheap way to cut down on plastic and style up your daily errands? A T-shirt tote bag might be your best bet. It’s simple, fast, and friendly to beginners.
Here is why it works: you upcycle an item you already own, and you end up with a sturdy bag you can use again and again. The bag holds groceries, books, or gym gear, and it looks unique every time.
What you need
– A few old T-shirts you’re ready to part with
– Scissors
– Optional: fabric paint, patches, or iron‑on designs
Step by step
– Gather your shirts and pick the strongest ones.
– Cut off the sleeves and the neckline. Leave the bottom hem intact.
– Turn the shirt inside out and tie knots at the bottom seam to form a bag. A single knot works, or double knots forExtra strength.
– If you want, decorate the bag with paint or patches for a personal touch.
Next steps
– Try making matching bags for friends or family. It’s a fun group project and a thoughtful gift.
– Add a longer strap by threading a strip of fabric from a second shirt. This makes the tote easier to carry on the go.
– Wash the finished bag before heavy use to prevent shrinking.
Tips for better results
– Choose thicker shirts for a sturdier bag. Thin tees can still work but may wear faster.
– Prewash shirts to avoid surprise shrinkage after your first wash.
– Clean, simple designs look clean and stylish on any print.
| Project | Materials Needed | Cost | Suggestions |
|---|---|---|---|
| T-Shirt Tote Bags | Old T-shirts, scissors, optional fabric paint | N/A | Try making matching bags for friends. |
| Denim Distressing | Jeans, scissors, tweezers, nail file | $9.49 (scissors) | Test a patch on old jeans first. |
| Fabric Flower Embellishments | Fabric scraps, scissors, hot glue gun | N/A | Use bright colors to make outfits pop. |
| Sweater to Scarf Transformation | Old sweater, scissors, needle and thread | N/A | Pair with a plain top for a layered look. |
| Jewelry from Old Accessories | Old jewelry pieces, pliers | N/A | Combine different metals and colors for texture. |
| Painted Shoes | Fabric paints, brushes, painter’s tape | $19.99 (fabric paint) | Test colors on a scrap first. |
| Ripped Denim Shorts | Old jeans, fabric scissors, sandpaper | N/A | Start with a longer length; trim more later. |
2. Denim Distressing

You want denim that looks fresh without buying new jeans. A quick DIY gives you that worn look and saves cash.
– Choose the right jeans Pick denim that keeps its shape. Avoid very soft fabrics that fray too easily.
– Plan your distress spots Think about where you want texture. Knees and hems read as cool, but pockets and seams can add subtle detail.
– Gather the tools You need scissors and a pair of tweezers. A nail file can help smooth edges if you want a cleaner finish.
– Make tiny cuts Cut small horizontal slits in your planned areas. Start with one or two, then add more if needed.
– Fray the edges Gently pull loose threads with the tweezers. Work slowly so the fray looks natural and the fabric stays sturdy.
– Set the look Wash the jeans in cool water after you finish. Air dry to let the threads settle and avoid over-stretching.
– Care and tweaks Trim stray threads as they appear. If you want more texture, repeat in a new area after a wash.
Give it a try this weekend. You will learn what looks best on your body and with your wardrobe.
Here is why you’ll love it: on-trend denim that fits well and costs little. Next steps: test a patch on an old pair, then try your favorites.
3. Fabric Flower Embellishments

If you want to refresh your outfits without buying new pieces, fabric flower embellishments can be your go-to move. They’re budget-friendly, simple to make, and you can customize them to fit your style.
What you need
– Fabric scraps in colors and textures you love
– Scissors that cut clean
– Hot glue gun and sticks
– Optional fabric stiffener for a sturdier bloom
– A safety pin or small hair clip for easy wear
How to make them
1) Cut circles of fabric in different sizes. Think small, medium, and large to build petals.
2) Layer the circles, smallest on top, to form a flower shape.
3) Squeeze a dab of glue in the center and press the layers together.
4) Let the glue dry fully before you touch it.
5) Attach the bloom to a jacket, bag, or hair accessory using a pin or clip.
Ways to style
– Use silk or satin for a shiny, dressy look.
– Mix cotton and satin for texture and depth.
– Catch the light with a little bead or rhinestone in the center.
– Add a fabric stiffener if you want a more structured bloom that keeps its shape.
Tips for best results
– Start with bright colors to make outfits pop.
– Vary circle sizes to create a fuller flower.
– Keep a few safety pins in your craft kit for quick changes.
– Heat a gentle curl into the edges for a softer, more natural flair.
Where to wear them
– Lapels on jackets and coats
– Straps on bags or purses
– Hair bands, clips, or headbands
– Hats and scarves for a personal touch
Next steps: gather scraps you don’t mind cutting, set aside a quiet 20 minutes, and experiment. With a little glue and color, you’ll have fresh details that make your outfits feel new—without spending a fortune.
4. Sweater to Scarf Transformation

If you own a sweater you love but never wear, turn it into a cozy scarf you will reach for all season. You save money and you add a new piece to your wardrobe in minutes.
Here is why this works. A soft knit feels warm and comfy. You use fabric you already own. It lets your style show with little effort.
What you’ll need
– An old soft sweater
– Scissors
– Needle and thread or a sewing machine
– Optional: tassels or fringe for a fun finish
Steps
– Lay the sweater flat. Cut off the sleeves at the seam.
– Decide how long you want the scarf. One long scarf (around 60 to 70 inches) works well, or cut both sleeves for two shorter pieces.
– Finish the edges to stop fraying. Use a simple running stitch, a zigzag, or a rolled hem.
– Add flair if you like. Attach tassels, fringe, or a small stitched stripe along one edge.
– For color play, leave a stripe of the sweater’s color at one end to match your outfit.
Style ideas and care
– Pair the scarf with a plain top and a coat for a layered look. The knit adds texture without shouting.
– Wash on gentle and lay flat to dry. This keeps chunky knits from shrinking.
Want more ideas? Try this with a cotton cardigan for a lighter scarf.
5. Jewelry from Old Accessories

Do you have broken or unused jewelry lying around? You can refresh it and save money at the same time. Here’s a simple upcycling plan you can do at home.
Steps to turn old accessories into new jewelry
– Gather old pieces. Look for items with color you like and metal you enjoy.
– Sort by color, metal, and style. This helps you see all your options.
– Pick a plan. Decide if you want a layered necklace, a new bracelet, or a bold centerpiece.
– Detach parts with pliers. Remove charms, links, or beads you don’t want. Save the bits you might reuse.
– Build your design. Connect parts with jump rings or a fresh clasp. Reattach charms to create a new look.
– Try a few layouts. Lay pieces on a tray to picture how they fit.
– Add a focal piece. A big charm or bead can center the design and draw eyes.
– Layer and mix. Combine different metals, bead colors, and chain textures for texture.
– Finish and test. Check the clasp, do a gentle pull test, and confirm comfort before wearing.
– Gift or keep. A finished piece makes a thoughtful present, or keep it for yourself.
These steps help cut waste and let you keep memories. You can save money and get a fresh look by reusing favorite charms in new ways. If a piece holds sentimental value, save the charm and remix the rest into a new design.
Tips
– Safety and care: clean pieces first, smooth any sharp edges.
– Memory notes: take a quick photo before changing a keepsake.
– Quick ideas: turn a broken necklace into a bracelet, or pair mismatched earrings as charms.
Unleash your creativity! Transform old accessories into stunning jewelry that’s uniquely yours. Upcycling not only saves money but also adds a personal touch to your style.
6. Painted Shoes

Your outfits can shine with fresh shoes. You want style without a big price tag. Painted shoes let you add color and personality fast. With fabric paints and a good seal, your art stays bright through rain and wear.
– Choose the shoes you want to update. Look for sneakers, boots, or flats with a smooth, paint-ready surface.
– Plan your design first. Sketch ideas on paper and pick colors that fit your wardrobe.
– Gather the supplies. You need fabric paints, fine brushes, painter’s tape, and a clear waterproof sealer.
– Prep the surface. Clean the shoes with mild soap and water. Let them dry completely before painting.
– Tape for clean lines. Use painter’s tape to mark borders and stripes.
– Paint in thin layers. Apply light coats and let each coat dry before adding more color.
– Seal and cure. Spray a waterproof sealant and let it cure for a full day.
– Care after painting. Wipe gently with a damp cloth and avoid direct sun for a while.
– Show off your look. Wear them to a party or photo day and share your work.
– Test colors first. Paint a small scrap or an inconspicuous area to check opacity and feel.
Next steps. Grab a pair. Choose a simple design to begin.
7. Vintage Handkerchief Shirt

Want a fresh look without buying new clothes? Turn vintage handkerchiefs into a stylish shirt you can wear all season. This simple project gives old fabrics new life and saves you money.
What you need
– A few vintage handkerchiefs in different colors or patterns
– A basic shirt pattern or an existing top to copy
– Scissors, pins, a ruler, and chalk or fabric marker
– Needle and thread or a sewing machine
– Optional: a little interfacing for a crisp neckline
Steps to make it
– Decide on the style. You can make a patchwork front or a full shirt from panels. Pick what you like best.
– Plan the layout. Lay out the handkerchiefs on a flat surface to see how they fit together.
– Cut with care. Slice each piece into rectangles or squares that match your plan. Leave seam allowances.
– Sew the pieces. Stitch them together along the edges to form the front, back, and sleeves.
– Finish edges. Hem the sleeves and bottom for a clean look. Iron the seams flat.
– Try different looks. Wear it loose, off the shoulder, or cropped. See what flatters you most.
– Tidy the fit. Check on your body and adjust the length or seam lines if needed.
Finish with a neat hem and a bit of starch for a crisp touch. Pair with jeans or a simple skirt. Care tips: hand wash cold and air dry to keep colors bright.
Breathe new life into vintage treasures! Transforming handkerchiefs into a chic shirt not only updates your wardrobe but also showcases your creativity – all while saving you money!
8. Patchwork Denim Jacket

Tired of a plain denim jacket? You can turn it into a one of a kind piece with patchwork. Here is why it works: scraps you already have become a bold design. You choose colors, textures, and patches to fit your vibe. Patchwork adds color, texture, and edge as you tell your story.
Patchwork plan
– Gather scraps that fit your vibe and clean the edges.
– Cut patches in different shapes and sizes for variety.
– Plan the layout by laying patches on the jacket first.
– Pin patches in place and sew around the edges with a neat stitch.
– Add embroidery or tiny stitches for extra texture.
– Style the jacket with a simple outfit so the patches pop.
Here are quick tips to help you last:
– Use a straight stitch or a tight zigzag to secure edges.
– Choose denim thread for strength.
– Wash cold and air dry to keep patches from peeling.
Next steps: Start with a sleeve patch to practice before tackling the whole jacket. If you want a vintage look, mix light and dark blues. For a street vibe, cluster patches of plaid and floral.
9. Upcycled Belt Bags

Want a hands free bag that costs less and still looks fresh? An upcycled belt bag does it. Turn an old bag into a waist pouch you can wear all day. It stays snug, frees your hands, and fits many outfits. Here is why this DIY works: you reuse what you already own and you swap looks in minutes.
– 1. Choose the bag Pick a bag you no longer use. Look for a sturdy body and a flat base. Leather, canvas, or fabric all work. Clean edges make the next step easier.
– 2. Pick a strap style Choose a belt or a chain. A wide belt gives grip; a slim chain looks sleek. Make sure the strap length fits your waist.
– 3. Plan the cut and placement Lay the bag flat and mark where the strap sits. Think about balance so the bag sits level when you move.
– 4. Attach the strap securely Cut the opening and fix the belt or chain to the bag. Use strong stitches or reliable hardware. Test by tugging gently.
– 5. Style and wear Try it with jeans, a dress, or workout gear. It works well for festivals and quick trips. Add a splash of color or hardware to match your vibe.
Next steps: you now have a practical, money saving upgrade. Keep a few bag shapes ready for different outfits and events.
10. Color Blocked Skirt

Want a fresh look without buying a new skirt? A color blocked skirt uses bold panels to wake up your wardrobe. You can pull fabric from old clothes or buy small scraps. It’s up to you, and the result is a chic, eye catching piece.
What you need
– One skirt you can reuse as a base
– 2 to 4 fabric panels in colors that match or pop against each other
– Matching thread and a sewing machine
– Scissors, pins, and a ruler
– A simple waistband option or a zipper
Color ideas
Choose panels in complementary colors or shades from the same family. Lay them out on a flat surface to see how they look together. Hold them in light to check if the blocks feel balanced.
Shape and length
A-line works with many fabrics. Knee or midi lengths show off the color blocks nicely. Plan how many panels you’ll sew—2 panels for a bold block, 3 or 4 for more contrast.
Steps
1) Cut your panels to fit the skirt length.
2) Sew the pieces together in the order you planned.
3) Attach a waistband and finish the top edge.
4) Hem and press for a clean finish.
Wear tips
Pair with a solid top so the blocks shine. Simple flats or a sleek heel complete the look.
Tips to avoid pitfalls
Keep seams flat and match grain when you cut. Wash with similar colors to keep blocks bright.
Next steps.
11. Upcycled Vintage Blouses

You want a fresh look from pieces you already own. Upcycled vintage blouses let you do that without breaking the bank. You gain style and a story in one shirt.
Here is why this works. Vintage fabrics have character. A simple trim or a new sleeve can change the whole mood. You also learn a bit of sewing as you go, which saves money in the long run.
– Choose blouses with sturdy seams and fabrics that drape well. Look for clean shoulders and intact buttons.
– Picture your new style before cutting. A crop, a puff sleeve, or a shorter hem can all work if the fabric behaves.
– Try easy edits first. Shorten sleeves, add a ruffle, or turn a long blouse into a cropped top. A soft lace trim at the hem can finish the look.
– Add a personal touch with embroidery or simple applique. A small floral on the pocket or collar makes it yours.
– Pair with high-waisted jeans or a midi skirt for a modern balance.
Next steps: wash, press, and mark your changes with chalk. Then cut with care and finish edges. Finally, press again and test outfits to see what works best.
As you try each change, take notes on fit and feel.
12. Beaded Bracelets from Old Necklaces

Here is why this idea matters. You can turn pieces that sit in a box into daily wear. You save money and gain one-of-a-kind jewelry. Plus, you learn a simple skill. It helps your old pieces feel new again. This is a quick project you can finish in one afternoon.
Let’s break it down into simple steps you can do this weekend.
– Gather old necklaces you want to repurpose.
– Remove the beads from the old necklace carefully using small pliers.
– Select a tough string or cord, like nylon beading thread.
– Plan your design with colors and textures in mind.
– String the beads onto the new bracelet, leaving space for a clasp.
– Attach a clasp or toggle from the piece or a new one.
– Add a little flair with a charm or pendant.
– Knot and secure, then dab a drop of glue on the knot; trim ends neatly.
– Try different sizes to fit wrists of family and friends.
– Wear your creation, gift it, or start a new bead idea collection.
Next steps: share your finished piece on social media or with a friend and start another bracelet.
13. DIY Silk Scarf Top

Want a fresh, budget-friendly top you can make at home? A silk scarf can become a stylish shirt in minutes. No sewing. No special tools. Just a few simple knots and folds.
What you need
– One silk scarf, about 40 to 60 inches long
– A mirror to check the fit
– Optional: a light tank to wear underneath for extra coverage
Two easy styles
– Halter neck top
– Drape the scarf around your chest so ends hang at your sides
– Bring the ends behind your neck and tie a secure knot
– Shorten or loosen the knot to shape the neckline
– Adjust the fabric for a clean, even look
– Wrap top
– Drape the scarf across your chest with a slight V at center
– Bring the ends around your back and cross them over your sides
– Tie a small knot or bow at the front or side
– Tuck in any loose edges for a smooth finish
Wear it with confidence
– Pair the scarf top with shorts or high-waisted jeans for a casual day out
– Layer it over a light tank when you want more coverage or sun protection
– Finish the look with statement earrings to draw the eye upward
Care and quick tips
– Silk loves gentle care. Hand wash in cool water or use a delicate cycle.
– Air dry away from direct heat to keep colors bright.
– If the scarf shrinks a bit, a light steam can help relax the fabric.
– Pick scarves with bold patterns or bright colors to maximize impact.
Next steps: pick a scarf, choose a style, and try both looks this weekend. You’ll have a chic, personal top in minutes.
Transforming your wardrobe doesn’t have to break the bank—just grab a silk scarf and a few knots! With a little creativity, you can create a chic top in minutes and keep your style fresh and unique.
14. Ripped Denim Shorts

You want cool shorts that fit your style and save you money. Ripped denim shorts are one easy fix. They work great for summer and don’t require new clothes. Here is why this DIY shines: it uses jeans you already own, it takes only a few simple tools, and you can make them your own with patches or colors.
What you’ll need
– A pair of old jeans you still like
– Fabric scissors
– A marker or chalk
– Sandpaper or a nail file
– Tweezers or a sturdy pin for pulling threads
– Patches or sewing kit if you want extra flair
– A sink or bowl for a quick wash after
Step by step
– Decide the length you want. Mark it with chalk on both legs.
– Cut straight across with clean, even lines. Start with a longer length; you can trim more later.
– Create the distress. Lightly rub the cut edges with sandpaper to dull the edge and add texture.
– Rip and fray. Use tweezers to pull threads in random spots for a natural, worn look.
– Add patches if you like. Sew or glue patches to cover spots or just for style.
– Finish by washing and air drying. This sets the look and softens the fabric.
Style ideas
– Pair with a graphic tee and sneakers for a casual vibe.
– Add a light belt and a cropped top for a street-ready look.
– Try a distressed finish with solid sandals for a breezy summer outfit.
Common questions
– Do I need to wash before distressing? A quick wash helps fibers bleed evenly later.
– How not to over-cut? Cut a bit at a time and check length frequently.
– How to keep threads from unraveling too much? Tie off loose ends or sew a light hem after distressing.
Next steps
– Pick jeans you actually wear. Start with a modest length, then adjust.
– Experiment with patches or different washing to change the mood.
– Share your results with friends or on a style board to get fresh ideas.
15. DIY Custom Embroidered Tees

You want to renew a tee with a personal touch, not spend more on new shirts. DIY embroidered tees let you mix colors you love and express your style. Start simple with a small motif, then add words or tiny scenes as you gain skill.
Materials you’ll need
– Embroidery hoop to keep fabric flat
– Embroidery floss in a few bright colors
– A sharp needle sized for fabric
– Water erasable pen or chalk for design transfer
– Tear away stabilizer or light fusible backing
– Scissors and a scrap piece for tests
– A tee you actually wear
Get ready
Wash and press the shirt. Place stabilizer inside. Center the tee on a flat surface. Clip the hoop over the area to stitch. Transfer the design with the pen to see where to stitch.
Simple stitching steps
Start with a tiny motif like a flower or leaf. Use backstitch for outlines, satin for fills, and a running stitch for lines. Keep stitches short and even. Take breaks and check your tension.
Tips to nail it
Practice on scrap fabric. Knot ends inside. End threads with a tiny knot. Stitch from center outward for balance.
Ideas and care
Try a short word, initials, or a tiny scene. When done, wash gently and air dry.
16. Patch Your Jeans

Your jeans look a bit tired in places. Patch them and save money while giving your wardrobe a fresh touch. Here is a simple, clear way to do it.
– Choose patches that fit your vibe Pick sturdy fabric patches or iron-on shapes in colors you love. Look for neat edges that hold up when you wash.
– Prep your jeans Wash the jeans first. Dry them completely and press them flat so patches sit cleanly.
– Plan layout Lay patches on the denim to see how they balance. Cover holes or make a playful panel along a leg. Snap a quick photo to remember the spot.
– Attach with no sewing If you want a quick fix, use fabric adhesive. Follow the instructions, then press the patch with a hot iron for the time shown.
– Stitch for lasting wear For durability, sew around each edge. Use a tight straight stitch or a small zigzag. Keep stitches close to the edge and steady.
– Care tips Let everything set before wearing. Wash the jeans inside out and air-dry to keep colors bright. Patchwork can be a fun, budget-friendly update that still feels you.
Give your old jeans a stylish makeover! A simple patch can breathe new life into your wardrobe while keeping your wallet happy. Fashion DIY is all about creativity and saving money!
17. Faded Denim to Chic Skirt

Here is why you want to turn faded jeans into a skirt. You get a stylish piece without buying new clothes. You cut waste and gain a versatile outfit.
– Pick jeans that fit well. You may not wear them now, but the fit matters.
– Decide the length. Knee length or calf length works for most tops.
– Plan your cut. Lay flat, mark a straight edge, and keep fabric even.
– Cut and sew. Remove the legs to make a front panel. Sew the sides to create a tube that becomes a skirt.
– Finish the edges. Hem by folding once or twice, then stitch so it won’t snag.
– Add pockets or details. A back pocket can stay; add lace, buttons, or tiny embroidery for flair.
Here is how it helps your style. It offers a modern look with easy care. It pairs with tees, camis, or a blouse for date night.
– Next steps. Gather faded jeans, a needle or machine, thread in a matching color, and a bobbin of patience. Set aside one afternoon and start. If you fear cutting, practice on scrap denim first. Try an A-line look by curving side seams. Smooth seams and press the hems as you go.
18. Upcycled Sweater Mittens

Staying warm this winter should not mean buying new stuff. You can turn old sweaters into cozy, upcycled mittens that fit your style and save money.
What you need
– Thick knit sweater in a color you like
– Scissors, pins, and thread or a sewing machine
– A simple mitten pattern or rough template
– Optional lining fabric like fleece or jersey
– Optional grip material for the palm
Here is why you want thick knit. It blocks cold air and feels soft on the skin.
Steps to make
– Cut two mitten shapes from the sweater. Use the pattern or draw a rounded shape with a thumb cutout
– Pin the pieces and sew around the edges, leaving the wrist open
– Add lining if you want extra warmth. Cut two lining shapes and sew them to the mitten pieces before you close them, then finish the seam
– Sew the outer fabric to the lining so both layers stay together
– Finish the wrist. Use a ribbed cuff from the sleeve or a simple fold for a snug fit
– If you like grip, add a small patch to the palm
Next steps to customize. Mix colors from different sweaters. Add a tiny tag or embroidery
Care and gifting
– Hand wash and air dry to keep the knit from shrinking
– They make thoughtful gifts for friends and family
19. DIY Fabric Bookmark

DIY Fabric Bookmark
Looking for a project that uses up fabric scraps and gives you a handy bookmark? A fabric bookmark fits. It’s cheap, simple, and fun for beginners.
What you’ll need
– Colorful fabric scraps
– A fabric rectangle about 2 by 6 inches (5 by 15 cm)
– Needle and thread or a small sewing machine
– Scissors and a ruler
– Optional embellishment: button or tassel
– Optional: fabric pen to add initials or a quote
How to make
– Cut a clean rectangle from your scrap fabric.
– Fold the edges and sew a neat hem so threads won’t fray.
– Turn it right side out and press flat.
– Add a simple embellishment at the end.
– If you want, stitch initials or a tiny word along the edge.
Style ideas and tips
– Pick bright thread to create strong contrast.
– Mix patterns for a playful, cozy look.
– Add a tassel or charm to the end for texture.
– Test different edge stitches like running stitch or a small zigzag.
Gift and use
– Keep a few on hand to gift to readers.
– It makes a thoughtful present for book lovers at any age.
Next steps: grab scraps, sew a few bookmarks, and slide them into books you lend or keep by your nightstand.
Conclusion

Fashion DIY projects are a wonderful way to express your creativity while saving money and being eco-friendly.
With so many ways to transform old items into something new and exciting, you’ll not only have a unique wardrobe, but also a sense of pride in your creations. What will you choose to upcycle next?
Frequently Asked Questions
What are some easy fashion DIY projects for beginners?
If you’re just starting out with fashion DIY, there are plenty of easy projects to dive into! A great option is the T-Shirt Tote Bag, which requires no sewing and can be completed in minutes. Another beginner-friendly idea is fabric flower embellishments that you can attach to your favorite outfits for a fresh look. These projects help you express creativity while being budget-friendly!
How can I upcycle old clothing items into something new?
Upcycling is a fantastic way to breathe new life into your wardrobe! You can turn an old sweater into a cozy scarf or transform faded jeans into a stylish denim skirt. The key is to think creatively about what you already own and how it can be reimagined. Check out the article for detailed steps on various upcycling projects that will save you money and help the environment.
What materials do I need for DIY fashion projects?
The materials you’ll need can vary depending on the project, but many fashion DIY projects require basic items like scissors, fabric glue, and thread. For projects like painted shoes or custom embroidered tees, you’ll also want fabric paints or embroidery floss. Don’t forget to gather any old clothes or accessories that you’re ready to transform into something new!
Are DIY fashion projects cost-effective compared to buying new clothes?
Absolutely! DIY fashion projects are typically much more cost-effective than purchasing new clothes. By upcycling and transforming items you already own, you can save money while refreshing your wardrobe. Many of the projects featured in the article are designed to be budget-friendly, allowing you to get creative without breaking the bank!
How can I incorporate DIY fashion into my personal style?
Incorporating DIY fashion into your personal style is all about creativity and self-expression! Start by choosing projects that resonate with your aesthetic—whether it’s patchwork denim jackets or custom embroidered tees. Mix and match your DIY creations with store-bought items to create unique outfits that showcase your individuality. The possibilities are endless, so have fun experimenting!